Introduction to Halloween Dirt Cups
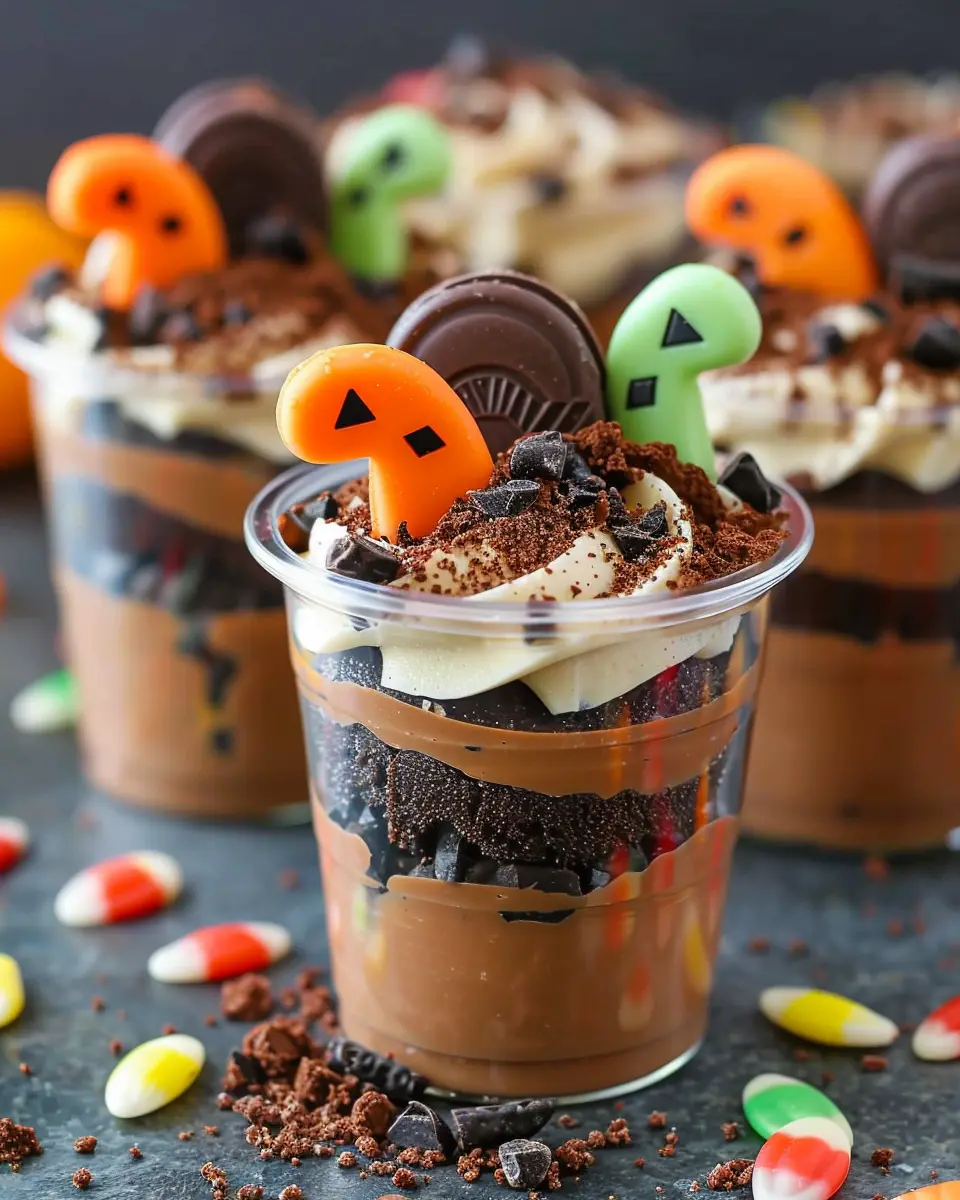
Halloween is the perfect time to unleash your creativity in the kitchen, and one delightful treat that embodies the spooky spirit is Halloween Dirt Cups. So, what exactly are these whimsical desserts? Imagine a layer of chocolate pudding, crushed cookies acting as “dirt,” and gummy worms taking a cozy rest—yes, it’s as playful as it sounds! This fun twist on classic pudding cups not only satisfies your sweet tooth but also adds a playful component to your autumn festivities.
For young professionals juggling busy schedules and social lives, Halloween Dirt Cups present an ideal dessert choice. First and foremost, they are incredibly simple to make. You can whip up a batch in under 30 minutes, leaving you plenty of time to prepare for that Halloween party without stressing about dessert. Not only are they quick to assemble, but they can also be tailored to suit individual tastes. Want to swap out the chocolate pudding for vanilla, or maybe incorporate some pumpkin spice? Go for it! The flexibility of this recipe means you can impress guests with minimal effort.
Another reason why Halloween Dirt Cups are a great choice is their visual appeal. With layers of chocolate pudding and crushed cookies, topped with vibrant gummy worms or even sprinkles, these cups scream festive fun. Plus, they’re served in individual cups, making them a perfect option for social gatherings. As you serve them up, you might just find friends reminiscing about their childhood Halloween parties—creating a sense of nostalgia and connection.
In today’s world, where social gatherings often revolve around themes, these cups can be a great conversation starter. For more on trendy Halloween treats, check out resources like The Spruce Eats that offer tons of festive ideas. So roll up your sleeves, grab some cups, and let’s get ready to make some deliciously creepy Halloween Dirt Cups! You’ll be the star of the party, and your friends will thank you for the trip down memory lane.

Ingredients for Halloween Dirt Cups
When it comes to creating delightful Halloween Dirt Cups, the right mix of ingredients can transform a simple dessert into a spooky sensation. Here’s what you’ll need to whip up this creative treat.
Essential ingredients to make the perfect Halloween Dirt Cups
- Chocolate pudding – The creamy foundation of your dirt cup.
- Crushed Oreos – For that earthy texture and flavor that really ties the dish together.
- Gummy worms – These creepy crawlies are a must for authentic Halloween flair.
- Whipped cream – Adds a light, fluffy layer on top.
- Plastic cups – Perfect for layering your treats and showing off those spooky layers.
Optional ingredients for added flair
Want to elevate your Halloween Dirt Cups even further? Consider these fun additions:
- Chocolate sprinkles – A sprinkle of these can add to the “dirt” effect.
- Candy corn – A festive touch that screams Halloween.
- Edible glitter – For that extra magical glimmer!
- Turkey bacon crumbles – Adds a savory twist for adventurous palates.
Mix and match these ingredients to create your own signature twist on this Halloween classic! For more ideas on how to use crushed Oreos in creative recipes, check out this detailed guide on Oreo desserts. Your Halloween gathering will be the talk of the town!
Step-by-step preparation of Halloween Dirt Cups
If you’re looking to impress your friends at your next Halloween gathering, Halloween Dirt Cups are a delightful, easy-to-make treat that combines fun and flavor. Whether you’re a seasoned chef or a kitchen novice, this step-by-step guide will help you create these spooky desserts effortlessly. Let’s dive right in!
Gather your supplies
The first step in making your Halloween Dirt Cups is to gather all the ingredients and tools you’ll need. This will save you from scrambling at the last minute and ensure a smooth preparation process.
Ingredients:
- 2 boxes of chocolate pudding mix
- 4 cups of milk
- 12 Oreo cookies (or another chocolate cookie of your choice)
- Gummy worms (for decoration)
- Plastic cups or jars (to serve the dirt cups)
Tools:
- Mixing bowls
- Whisk
- Rolling pin or food processor (for crushing cookies)
- Spoon for layering
Everything ready? Great! Now let’s get started.
Prepare the pudding layer
Next up is the delicious and creamy pudding layer that makes these cups absolutely irresistible. In a mixing bowl, combine the two boxes of chocolate pudding mix with 4 cups of milk. Using a whisk, mix until it’s smooth and free of lumps.
Don’t rush this step—give it a few minutes to thicken properly. Once it’s ready, cover it with plastic wrap and place it in the refrigerator to chill for about 5-10 minutes. This chilling time helps achieve that perfect texture that will enhance your Halloween Dirt Cups.
Crush the cookies for the “dirt”
While your pudding is chilling, it’s time to prepare the dirt layer. Take your Oreo cookies (or another chocolate cookie) and crush them. You can do this by placing the cookies inside a plastic zip bag and rolling over them with a rolling pin. Alternatively, a food processor works wonders for a finer crumble.
Aim for a consistency that resembles dirt—some big chunks are okay for that realistic touch! Set aside a portion to adorn the top of your cups later—presentation matters, especially for Halloween!
Assemble the layers
Now comes the fun part—assembling your Halloween Dirt Cups! Grab your plastic cups or jars and start layering. Begin with a layer of chocolate pudding, about one-third full. Follow it up with a generous layer of your crushed cookies. Repeat this process until you reach the top of the cups.
Finish with a final layer of crushed cookies to create the appearance of soil. Don’t be shy about adding a little extra for visual effect!
Top with spooky decorations
To make your Halloween Dirt Cups extra eerie, it’s time to get creative with toppings. Gummy worms are a classic choice, but you can also add candy pumpkins, edible spiders, or even a sprinkle of edible glitter for a magical twist.
When placing the gummy worms, let them hang over the edge or partially buried in the “dirt” layer for added effect. Your guests will love how fun and festive these cups look.
And there you have it—simple, step-by-step instructions to create Halloween Dirt Cups that not only look the part but taste amazing too!
These treats are perfect for Halloween parties, potlucks, or just a fun dessert for a spooky movie night. So, roll up your sleeves, gather your ingredients, and get ready to enjoy a deliciously spooky treat!
Looking for more great recipes? You might find inspiration on Taste of Home or Food Network. Happy Halloween!

Creative Variations of Halloween Dirt Cups
Fun Halloween-themed variations
When it comes to Halloween Dirt Cups, there’s no limit on creativity! You can take this classic treat and add unique twists to make it even more festive.
-
Monster Munch: Add gummy eyeballs and green sprinkles to your cups, and top them with whipped cream to create a “monster” theme. These little details can make a big difference in presentation and fun!
-
Graveyard Scene: Use chocolate cookies crumbled on top as “dirt”, but then add gravestone-shaped cookies made from sugar or chocolate. You could even stick in some candy skeletons to elevate that spooky vibe!
-
Witch’s Brew: Swap out the vanilla pudding for green-colored pistachio pudding. It adds an unexpected flavor and a whimsical twist for your guests to enjoy!
Feel free to experiment with flavors and colors to match your Halloween theme—Google for inspiration, or check out some festive Pinterest boards!
Healthier alternatives for Dirt Cups
Looking for a way to indulge without the guilt? Try these healthier alternatives for your Halloween Dirt Cups:
-
Greek Yogurt Base: Replace pudding with Greek yogurt for a protein-rich option. Adding a touch of honey or maple syrup can sweeten it to your liking.
-
Fruit Layers: Incorporate fresh berries or banana slices for textures and a nutritious punch. You can blend these into smoothies for an exciting filling.
-
Nut-Based Crust: Instead of using cookies, consider a ground almond or coconut crust. It adds healthy fats while keeping that delightful crunch.
Incorporating these changes not only keeps your treats healthier but also adds new flavors that guests will appreciate. Check out this detailed guide on alternative dessert options for a scrumptious treat without a sugar overload. Eating well doesn’t have to sacrifice taste or fun!
The versatility of Halloween Dirt Cups means there’s something for everyone, and it can be a fun activity to decorate and create with friends or family. So, which variation will you try this Halloween?
Cooking Tips and Notes for Halloween Dirt Cups
Common Pitfalls to Avoid
When making Halloween Dirt Cups, even the simplest mistakes can dim your spooky fun. Watch out for:
-
Overmixing the pudding: This can lead to a grainy texture. Aim for just enough mixing until your ingredients are blended!
-
Skipping the chill time: Allowing the pudding to set in the fridge for at least an hour enhances the flavor and consistency. Patience pays off!
-
Choosing the wrong cups: Opt for clear containers—seeing the layers is part of the charm!
Quick Fixes for Mistakes
If things don’t go according to plan, don’t fret. Here’s how to salvage your Halloween Dirt Cups:
-
If your pudding doesn’t thicken, whisk in an extra tablespoon of cornstarch over low heat until it reaches the desired consistency.
-
If you run out of toppings, crushed cookies or even gummy worms can add unexpected delight, enhancing both texture and flavor.
These tips will help ensure your Halloween Dirt Cups turn out spooktacular and memorable! For more ideas, check out sources like Food Network for creative dessert toppings and twists. Happy haunting in the kitchen!

Serving Suggestions for Halloween Dirt Cups
Fun Presentation Ideas
Make your Halloween Dirt Cups stand out with creative presentation! Try layering the chocolate pudding and crushed cookies in clear cups to showcase that spooky layer of “dirt.” Top each cup with gummy worms, plastic spiders, or edible glitter for an extra festive touch. You can even use small pumpkins or cauldrons as vessels for a fun theme. If you’re feeling crafty, consider creating a spooky label for each cup, perhaps naming them something fun like “Wormy Graveyard” or “Potion Parfait.”
Portion Sizes for Gatherings
When serving Halloween Dirt Cups at parties or gatherings, consider portion sizes. Small plastic cups (about 4-6 oz) are perfect for guests to sample without overindulging. This size allows everyone to enjoy a cup while leaving room for other treats. If you’re hosting a large group, prepping in advance can save you time; a batch of 10-15 cups can be prepared in one go. Don’t forget to have spoons on hand—maybe even themed ones for an added touch!
For more ideas and tips on spooky presentations, check out The Spruce Eats or Food Network.
Time Breakdown for Halloween Dirt Cups
When you’re whipping up these delightful Halloween Dirt Cups, it’s helpful to know how much time you’ll need for each step.
Preparation Time
Getting started takes about 20 minutes. This includes gathering your ingredients like chocolate pudding, crushed cookies, and any spooktacular toppings you want to add. Don’t forget to set the mood with your favorite Halloween playlist!
Chilling Time
After you’ve assembled your cups, let them chill in the fridge for around 2 hours. This allows the flavors to meld perfectly and gives that tempting fresh texture.
Total Time
In total, you’re looking at about 2 hours and 20 minutes from prep to serving. Perfect for getting ready for a Halloween gathering or a cozy night in! For more festive ideas, check out sources like Food Network or AllRecipes.
Nutritional facts for Halloween Dirt Cups
When it comes to indulging in Halloween Dirt Cups, it’s nice to know what you’re serving up. Let’s dive into the nutritional profile of this delightful treat!
Calories per serving
Each serving of Halloween Dirt Cups contains approximately 200 calories. This makes it a fun option for a dessert that won’t completely derail your healthy eating goals.
Sugar content
With about 18 grams of sugar per serving, you’ll definitely satisfy those sweet cravings. However, consider balancing this treat with a nutrient-rich meal beforehand to keep your diet on track!
Fun nutrition facts about the ingredients
- Chocolate Pudding: A great source of calcium and can improve your mood with its rich cocoa content.
- Crushed Oreos: Did you know Oreos have their own fan club? It’s a guilty pleasure that offers a bit of energy thanks to its sugar content.
- Gummy Worms: These playful additions are not only fun but often made with gelatin, which can be beneficial for your joints!
So, while indulging in Halloween Dirt Cups, you can appreciate the sweet side while keeping some nutritional facts in mind. For more tips on health-conscious treats, check out sources like Healthline for balanced eating strategies!
FAQs about Halloween Dirt Cups
How do I make my Dirt Cups more festive?
Ready to amp up your Halloween Dirt Cups? Consider adding some themed toppings! Crushed Halloween candies like gummy worms, edible eyeballs, or candy pumpkins can bring glee to your treats. You can also use chocolate cookie crumbs for a dirtier look or even sprinkle some edible glitter on top for a sparkling effect. A few well-placed plastic spiders can add a fun, spooky touch too. Get creative—after all, presentation is key when it comes to festive treats!
Can I make them ahead of time?
Absolutely! One of the best parts about Halloween Dirt Cups is that they can be prepared in advance. You can assemble the layers of pudding, whipped cream, and cookie crumbs, then cover them tightly and store them in the refrigerator for up to 2 days. Just add your fun toppings right before serving to keep them fresh and visually appealing. This can save you valuable time on party day and lets you enjoy the festivities without rush.
What are some ingredient substitutes for special diets?
No need to miss out on these spooky delights—there are plenty of Dirt Cups ingredient substitutes for various dietary needs. For a vegan option, swap regular pudding for a plant-based variety. Use coconut or almond whipped cream for a dairy-free twist. If you’re looking for gluten-free options, simply choose gluten-free cookies for the crumb layer. For those following a low-sugar diet, consider using sugar-free pudding mixes and sweeteners. By customizing these recipes, everyone can join in the fun!
If you’re looking for more festive ideas, check out sites like Healthline or EatingWell for ingredient swaps and tips.
Conclusion on Halloween Dirt Cups
Making your own Halloween Dirt Cups is not only a fun activity but also a delightful way to personalize your celebrations. You get to choose your favorite toppings—whether it’s gummy worms or spooky sprinkles—that suit your taste and those of your guests.
The simplicity of the recipe lends itself to creativity, offering both the young and the young-at-heart an opportunity to get hands-on in the kitchen. Plus, these delicious treats are perfect for parties or simply enjoying at home.
Ready to celebrate? Check out this article from Food Network for more fun Halloween recipe ideas! Embrace the spirit of the season and enjoy every spoonful.
PrintHalloween Dirt Cups: Easy, Fun Treats for Spooky Gatherings
These Halloween Dirt Cups are a fun and easy dessert perfect for Halloween gatherings. Layered with chocolate pudding, crushed cookies, and gummy worms, they are sure to delight both kids and adults!
- Prep Time: 20 minutes
- Cook Time: 0 minutes
- Total Time: 20 minutes
- Yield: 4 servings 1x
- Category: Dessert
- Method: No-bake
- Cuisine: American
- Diet: Vegetarian
Ingredients
- 1 package chocolate pudding mix
- 2 cups milk
- 1 package chocolate sandwich cookies
- 1 cup whipped cream
- 1 cup gummy worms
Instructions
- Prepare the chocolate pudding according to package instructions and set aside.
- Crush the chocolate sandwich cookies into fine crumbs.
- In clear cups, layer the chocolate pudding, whipped cream, and cookie crumbs.
- Top each cup with gummy worms for decoration.
- Chill until ready to serve.
Notes
- Feel free to use different types of candies for topping.
- These can be made a day in advance for easier preparation.
Nutrition
- Serving Size: 1 cup
- Calories: 300
- Sugar: 25g
- Sodium: 200mg
- Fat: 15g
- Saturated Fat: 8g
- Unsaturated Fat: 5g
- Trans Fat: 0g
- Carbohydrates: 40g
- Fiber: 2g
- Protein: 5g
- Cholesterol: 30mg
Keywords: Halloween, Dirt Cups, Dessert, Treats